I'm still officially convalescing but I feel a bit of a fraud, as I am actually healing very well and I feel very well. I'm very limited in what I am allowed to do around the house: I'm not allowed to lift things, or go up ladders, or do anything that really classes as "work". However, I am being obedient and not risking anything, probably until Christmas. The only thing that I don't like to do too much is bending down, as that puts pressure on the wound across my abdomen; this doesn't hurt at all but it just feels like a bad idea!
I went outside the back of the house today for the first time in ages, where it really is cold and damp. I was surprised to see that my new grey limestone slabs all have a green tinge. I presume that this discoloration will last until next Spring, when I would hope that the slabs will dry out as the temperature rises and, like the walls of the house, the green will just disappear. There is no way that I want to take a pressure hose to these slabs every year!
The conditions outside were a forceful reminder about the way to treat an old building; we are dry and quite warm inside, and this was achieved by using no cement, no damp proof course and no modern plaster in the restoration of the house (although of course the extension was built entirely in the modern way). I've only lit the front room fire once, and the woodburner not at all, as I am still waiting for it to turn cold! After all, I don't want to waste firewood. The secondary glazing helps enormously, and keeping draughts down by closing internal doors helps as well although of course the paradox is that good ventilation is essential. The first rule is that if you are not wearing a jumper then you can't complain about the cold inside the house, and the second rule is that if you turn the thermostat up then you can't complain about the size of the gas bill!
Wednesday, 27 November 2013


Tuesday, 29 October 2013
The Best Thing I've Ever Done
Well, the afore-mentioned kidney transplant operation has come and gone; everything was remarkably successful. The removal was virtually painless for me, and my brother is now a "new man". I do not think that we really knew how ill he was, but we do now as we see a much fitter version, literally "in the pink" and no longer feeling tired all the time. All the stats are going in the right direction and so he just has to re-adjust to a life of balancing anti-rejection drugs with the risk of infection (as the drugs inhibit the immune system).
If you are interested in the idea of living kidney donation, please see the whole story of my donation at http://diaryofakidneydonor.blogspot.co.uk/. It's quite surprising - I'm a reserved logical person but this experience has really found the emotion in me (especially the entry on Oct 21st).
Please become an organ donor - see http://www.organdonation.nhs.uk/ - and make sure that your next of kin know that this is what you want. Apparently a surprisingly high number of donor card holders do not donate anything when they die because their relatives still have a veto. At least I can be sure that my next of kin know how I think!
I now have a good excuse to catch up on gentle activities like walking, writing and reading as, even though I feel great, I am banned from doing anything more serious than lifting a glass or mug for a fair while.
If you are interested in the idea of living kidney donation, please see the whole story of my donation at http://diaryofakidneydonor.blogspot.co.uk/. It's quite surprising - I'm a reserved logical person but this experience has really found the emotion in me (especially the entry on Oct 21st).
Please become an organ donor - see http://www.organdonation.nhs.uk/ - and make sure that your next of kin know that this is what you want. Apparently a surprisingly high number of donor card holders do not donate anything when they die because their relatives still have a veto. At least I can be sure that my next of kin know how I think!
I now have a good excuse to catch up on gentle activities like walking, writing and reading as, even though I feel great, I am banned from doing anything more serious than lifting a glass or mug for a fair while.
Wednesday, 9 October 2013
The Year's Work Draws to a Close
My impending operation (see http://diaryofakidneydonor.blogspot.co.uk/) is now only a week away so the end of the year's work is close for me. I will be in no position to be able to do anything at all strenuous or difficult for some time, almost certainly into 2014. That will of course mean that any lifting is out but even bending down might be too much for me for a while. These last few days have been concentrated therefore on doing various odd bits which either really must be done now (or wait for another year) or else are things which have a benefit exceeding the time and effort required (i.e. they please 'Er Indoors).
One important thing was to put an insert into the chimney pot for the fire in the third bedroom. We have twice had an idiot wood pigeon fall down this, presumably by falling asleep and overbalancing (and probably not the same bird). The first time was before I fitted the secondary glazing; it got into the bedroom and I was able to open the window and shoo it out. The second time was this summer and I had fortunately removed the secondary glazing for ventilation; this time it was sat just up in the chimney refusing to budge, so I had to open the window, reach up with a gloved hand, grab and then quickly throw whatever I had grabbed out of the window. It flew off leaving a trail of feathers, but it was not impressed at this treatment!
The difficulty in stopping pigeons falling down was that (a) I didn't want to block off the chimney as it needs to be ventilated, (b) the top of the chimney is about 9 feet above the gutters so it is VERY high and (c) the chimney is rectangular and no-one seems to sell a rectangular vented clay hat. I therefore made my own device but it looks so odd that I'm embarrassed to add a photo of it. To fit it I borrowed a ladder which reached the fascia and used a long pole with a hook on the end and managed to lower the device into place without falling off the ladder. Thinking about that now, perhaps I shouldn't have taken that risk as any injury would have scuppered the operation next week.
Secondly, I've had to cut the grass which was only laid a couple of weeks ago. I thought that this would not be needed again before winter but it was almost 10cm high, so I've done a high trim. It looks as though it has been down for years.
Thirdly, I've been doing various bits in the lounge, such as tackling the plaster which was damaged during fitment of the window (the one fitted in June 2011...). I've also sorted the wooden poles which form the corners of the plaster on the chimney breast and the window bay. These had been papered over years ago but have now been scraped clean and given a coat of wood hardener which has brought them up nicely. Finally, I removed the door and cut a half inch off the bottom so that we can lay carpet somewhen; while it was off I decided to remove the brown gunk (it's not paint or varnish) on the inside, ready for painting somewhen. When all the dirty work is done we can seriously plan to buy a carpet, which will please the other half a lot!
The final job was outside again: the ivy in one apple tree had been ignored as it gave privacy and security (as well as cover for birds). I realised that it was very high so I decided to remove a lot of this to allow the tree to breathe again and possibly grow better next spring. It's a once a year job for the autumn only so it was now or leave it for another year. Now I have to dispose of the foliage!
One important thing was to put an insert into the chimney pot for the fire in the third bedroom. We have twice had an idiot wood pigeon fall down this, presumably by falling asleep and overbalancing (and probably not the same bird). The first time was before I fitted the secondary glazing; it got into the bedroom and I was able to open the window and shoo it out. The second time was this summer and I had fortunately removed the secondary glazing for ventilation; this time it was sat just up in the chimney refusing to budge, so I had to open the window, reach up with a gloved hand, grab and then quickly throw whatever I had grabbed out of the window. It flew off leaving a trail of feathers, but it was not impressed at this treatment!
The difficulty in stopping pigeons falling down was that (a) I didn't want to block off the chimney as it needs to be ventilated, (b) the top of the chimney is about 9 feet above the gutters so it is VERY high and (c) the chimney is rectangular and no-one seems to sell a rectangular vented clay hat. I therefore made my own device but it looks so odd that I'm embarrassed to add a photo of it. To fit it I borrowed a ladder which reached the fascia and used a long pole with a hook on the end and managed to lower the device into place without falling off the ladder. Thinking about that now, perhaps I shouldn't have taken that risk as any injury would have scuppered the operation next week.
Secondly, I've had to cut the grass which was only laid a couple of weeks ago. I thought that this would not be needed again before winter but it was almost 10cm high, so I've done a high trim. It looks as though it has been down for years.
Thirdly, I've been doing various bits in the lounge, such as tackling the plaster which was damaged during fitment of the window (the one fitted in June 2011...). I've also sorted the wooden poles which form the corners of the plaster on the chimney breast and the window bay. These had been papered over years ago but have now been scraped clean and given a coat of wood hardener which has brought them up nicely. Finally, I removed the door and cut a half inch off the bottom so that we can lay carpet somewhen; while it was off I decided to remove the brown gunk (it's not paint or varnish) on the inside, ready for painting somewhen. When all the dirty work is done we can seriously plan to buy a carpet, which will please the other half a lot!
The final job was outside again: the ivy in one apple tree had been ignored as it gave privacy and security (as well as cover for birds). I realised that it was very high so I decided to remove a lot of this to allow the tree to breathe again and possibly grow better next spring. It's a once a year job for the autumn only so it was now or leave it for another year. Now I have to dispose of the foliage!
Friday, 20 September 2013
The Back Garden takes shape
This post could just as easily be entitled "The Beginning of the End for the Builder's Yard", which is what my side and back garden has been for the last two years since we moved in. At last I have made some significant progress to making it look right; I previously reported the completion of the paving here - that was a bit premature as actually there were five left to do, which I wanted to do at the same time as the little back wall.
As I've said before, this wall is just four courses high but fills several important functions: firstly it provides a good edge for the limestone paving laid on sand; secondly it retains a foot of earth at the base of the stone wall where we had lowered the ground level (this was essential for drainage but I was worried about whether we had gone down too far and that the foundation of the wall might erode); thirdly, it's a home for a good amount of spare earth which I had acquired whilst laying the flagstones and finally, it looks good!
At the far end you can see the foundation for the brick barbeque which I hope to do soon. The last five flagstones are the ones at the top, beside the wall and the barbeque.
The other major task just completed is that yesterday we collected 20 sq m of turf, which I have laid today.
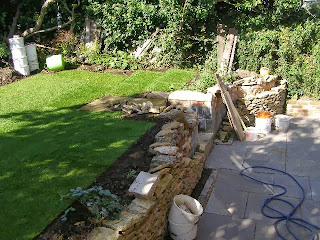 This is what now permits me to say that it is now more of a garden than a builder's yard (although you can still see a pallet, my mixer and various plastic tubs in the above photo! Here's a photo of the lawn, (left) with the steps and the unfinished stone wall beside the house (which is just out of picture on the right), and you can just see a bit of the low brick wall which runs across the back of the house (on the extreme right).
Top tip for turfing: buy good turf! It should be consistently thin but strong; if not it's a nightmare (I learned that a long time ago; these were great).
I think you will agree that it's a large change from what we bought almost three years ago:
 I reckon the above photo is taken from almost exactly the same place as the one of the lawn above it; the ivy covered apple tree is in the middle at the top of the lawn photo (I just pointed the camera down at the lawn a bit more). In fact this overgrown photo was taken in March 2011 after five months work - the "as purchased" condition was so bad that you couldn't even walk there due to the vegetation.
As I've said before, this wall is just four courses high but fills several important functions:
 firstly it provides a good edge for the limestone paving laid on sand; secondly it retains a foot of earth at the base of the stone wall where we had lowered the ground level (this was essential for drainage but I was worried about whether we had gone down too far and that the foundation of the wall might erode); thirdly, it's a home for a good amount of spare earth which I had acquired whilst laying the flagstones and finally, it looks good!
At the far end you can see the foundation for the brick barbeque which I hope to do soon. The last five flagstones are the ones at the top, beside the wall and the barbeque.
The other major task just completed is that yesterday we collected 20 sq m of turf, which I have laid today.

Top tip for turfing: buy good turf! It should be consistently thin but strong; if not it's a nightmare (I learned that a long time ago; these were great).
I think you will agree that it's a large change from what we bought almost three years ago:

Friday, 6 September 2013
Feeling Worn Out
I've done almost half of the one foot high brick wall which edges the paving at the end of the garden. It will be about 13 feet long and have a brick built barbeque stand at one end. The foundation is concrete, and the reclaimed Imperial bricks are laid with lime mortar which matches the house. This wall gives a solid edge for the paving laid on sand, and also resolves a worry I had about whether we had taken the ground down too far beside the 6ft stone wall; it will raise the ground level at the base of the wall thus preventing erosion, and also I can dispose of a good quantity of excavated earth behind it.
I spent yesterday working at my normal speed, until about 3pm. I had done two major e-mails on church business which, with a phone call as well, had taken most of the morning, and then I got on with the foundations for the second half of the wall. This was hard work as yesterday was very hot, and I was digging through a layer which contains animal bone (no human has teeth that size!) and a good amount of local brash. This stuff is annoying as you have a few bits of stone as large as your hand hidden in good earth, and if partly hidden they still have to be removed. Suddenly I realised that actually I was very tired, and that I wasn't going to finish digging the hole and mix a load of concrete in what was left of the afternoon. So I stopped and at that same moment decided that I would do nothing at all today as well - just have a day off.
I've had a bit of a poor throat recently, but last night I slept pretty well. I had to get up at 6.30 to take t'other half to the station, and when I came back I went back to bed with another cup of tea. Next thing I knew it was 10.00am! I went to the shops for a few essentials and a haircut, and only then realised that I had not had any breakfast. After lunch I found myself watching the Formula 1 practice on TV, and an old film with Telly Savalas. I certainly feel rested and much better today; perhaps this is what retirement is meant to be like?
Yes, there are still lots of things I could do around the house and garden, and I know I have to finish doing things by October 16th (operation day) but I am determined not to let these jobs put such pressure on me in the future.
I spent yesterday working at my normal speed, until about 3pm. I had done two major e-mails on church business which, with a phone call as well, had taken most of the morning, and then I got on with the foundations for the second half of the wall. This was hard work as yesterday was very hot, and I was digging through a layer which contains animal bone (no human has teeth that size!) and a good amount of local brash. This stuff is annoying as you have a few bits of stone as large as your hand hidden in good earth, and if partly hidden they still have to be removed. Suddenly I realised that actually I was very tired, and that I wasn't going to finish digging the hole and mix a load of concrete in what was left of the afternoon. So I stopped and at that same moment decided that I would do nothing at all today as well - just have a day off.
I've had a bit of a poor throat recently, but last night I slept pretty well. I had to get up at 6.30 to take t'other half to the station, and when I came back I went back to bed with another cup of tea. Next thing I knew it was 10.00am! I went to the shops for a few essentials and a haircut, and only then realised that I had not had any breakfast. After lunch I found myself watching the Formula 1 practice on TV, and an old film with Telly Savalas. I certainly feel rested and much better today; perhaps this is what retirement is meant to be like?
Yes, there are still lots of things I could do around the house and garden, and I know I have to finish doing things by October 16th (operation day) but I am determined not to let these jobs put such pressure on me in the future.
Monday, 2 September 2013
Doing Things Again - Part 2
I have mentioned before about my dislike of having to do some things again - see this entry from June. One of those items was the framed, ledged and braced internal door bought from b****y W****s which was fitted in the new extension as the toilet door almost two years ago. The problem is that it no longer fits in the door frame, even with force; the vertical hinge edge (a bit of planed 4 x 2) has twisted, so that
it went one way at the top and the opposite way at the bottom compared
to the vertical boards.
Well, I've finally got round to doing something about it by complaining to the retailer whose customer serices firstly tried the excuse that it was "too long ago": no, it's not, as the door is not "fit for purpose" (Sale of Goods Act). Then it was "you'll need the receipt", hoping that I didn't have it - WRONG (it took me one minute to find it in my file)! Then they seemed to hope that they could bore me into submission by disagreeing within the company about who should look after my complaint. When that didn't work (it is the branch's responsibility, btw), the chap in the branch lost my details on his desk (!), so I had to remind him. Then they asked me to send photos so that they could pass them on to their supplier, which I did the same day, despite the problems of taking photos to show the twist in a fitted door in a small space. Finally, having had no answer a couple of weeks later, I sent an e-mail to the chap in the branch, reminding him that under the Sale of Goods Act, my contract is with his employer, not with the manufacturer. At last, he caved in and offered me a refund, if I would "like to bring the door back, and the receipt", which I did by 10am the next morning. It was good to be able to show him the defect, as then even he had to admit that it was pretty poor.
I declined his offer of another door - "we now have a different supplier" - and went back to my favourite reclamation yard (Burgess Reclamation) where I bought a much nicer door at a much increased price. This one is just ledged, with just four vertical planks from reclaimed floorboards. Then I thought I would treat the knots, so at T----- P-----, I found some knot sealer and asked the obvious question "does it allow me then to stain the wood or will I see patches?" To my surprise no-one knew, so I bought it anyway. The answer is that it does, but I overcame this by treating the entire door with the stuff so it is all the same colour (a quite attractive dark-ish pine). It is now fitted, with bolt and a pull handle (the handle part of a rusted original Suffolk latch) on the inside, plus a door knob on the outside; I still haven't worked out how to fit a latch to a ledged door with no frame. Perhaps I should buy another hand made Suffolk latch, but then I would have to change all the moulded architrave... sigh.
Well, I've finally got round to doing something about it by complaining to the retailer whose customer serices firstly tried the excuse that it was "too long ago": no, it's not, as the door is not "fit for purpose" (Sale of Goods Act). Then it was "you'll need the receipt", hoping that I didn't have it - WRONG (it took me one minute to find it in my file)! Then they seemed to hope that they could bore me into submission by disagreeing within the company about who should look after my complaint. When that didn't work (it is the branch's responsibility, btw), the chap in the branch lost my details on his desk (!), so I had to remind him. Then they asked me to send photos so that they could pass them on to their supplier, which I did the same day, despite the problems of taking photos to show the twist in a fitted door in a small space. Finally, having had no answer a couple of weeks later, I sent an e-mail to the chap in the branch, reminding him that under the Sale of Goods Act, my contract is with his employer, not with the manufacturer. At last, he caved in and offered me a refund, if I would "like to bring the door back, and the receipt", which I did by 10am the next morning. It was good to be able to show him the defect, as then even he had to admit that it was pretty poor.
I declined his offer of another door - "we now have a different supplier" - and went back to my favourite reclamation yard (Burgess Reclamation) where I bought a much nicer door at a much increased price. This one is just ledged, with just four vertical planks from reclaimed floorboards. Then I thought I would treat the knots, so at T----- P-----, I found some knot sealer and asked the obvious question "does it allow me then to stain the wood or will I see patches?" To my surprise no-one knew, so I bought it anyway. The answer is that it does, but I overcame this by treating the entire door with the stuff so it is all the same colour (a quite attractive dark-ish pine). It is now fitted, with bolt and a pull handle (the handle part of a rusted original Suffolk latch) on the inside, plus a door knob on the outside; I still haven't worked out how to fit a latch to a ledged door with no frame. Perhaps I should buy another hand made Suffolk latch, but then I would have to change all the moulded architrave... sigh.
Sunday, 18 August 2013
Paving Part 4 - Finished At Last!
I realise that I never uploaded photos of the progress with the paving - I think that was because my camera batteries expired. At the time of my last post on paving - here - I had started laying the slabs at the back of the house but had yet to tackle the back door step. Since then I have made considerable progress:
Firstly, I did the back door step. This uses some old engineering bricks
 (in a sort of larger than usual Imperial size) on a concrete foundation set in a rectangle, with one in the middle as well; in the photo (right) there are extra ones inside which were used to support the temporary step while the cement set. After they were removed, the structure was in-filled with gravel and topped with a 90cm x 60 cm x 4cm limestone slab which matches the ones I've been laying. The step is above halfway as you have to step over the bottom of the door frame and, in any case, it is quite difficult getting that sort of thing spot on.
The result is pretty pleasing and certainly my grandson finds it easy to use, which is what matters. The rest of the paving was pretty easy, aided by judicious use of an angle grinder, hired for possibly the last time.
 Here you can see the finished back door step surrounded by the paving, with the addition of the stone seat which I bought on the spur of the moment at my favourite reclamation yard. My grandson has already found out with his head how solid the stone seat is!
I'm also quite pleased with the infill up to the wall: this is "self-compacting gravel" as recommended by my groundworker for the driveway, and it seemed a good thing to fill the gap. Having a thing about dampness, even in a brand new construction with a DPC like this, I didn't want the stone going up to the wall as that would then cause rain to splash on the wall.
Then, last week, we had the pleasure of sitting with the entire family on our patio for the very first time; I now have to do the barbecue - if there is any summer left for entertaining.
Firstly, I did the back door step. This uses some old engineering bricks

The result is pretty pleasing and certainly my grandson finds it easy to use, which is what matters. The rest of the paving was pretty easy, aided by judicious use of an angle grinder, hired for possibly the last time.

I'm also quite pleased with the infill up to the wall: this is "self-compacting gravel" as recommended by my groundworker for the driveway, and it seemed a good thing to fill the gap. Having a thing about dampness, even in a brand new construction with a DPC like this, I didn't want the stone going up to the wall as that would then cause rain to splash on the wall.
Then, last week, we had the pleasure of sitting with the entire family on our patio for the very first time; I now have to do the barbecue - if there is any summer left for entertaining.
Wednesday, 14 August 2013
Window Arch Repair
The windows of the house have bricks to provide good edges around the window, as the walls are made of random rubble. Above the window is an arched soldier course, i.e. of bricks on their end, and these are called rubbers. This is, I believe, because the bricks are actually slightly tapered in order to give the arch its shape, and this taper was achieved by rubbing the bricks against each other.
 Above the hall window is the soil pipe we fitted in 2011, and when we did that I observed that the surrounding stonework was not in great nick (see first photo). I did a bit of pointing in this area last year (or was it 2011?), doing some deep fill and letting it go off before doing the surface bit in an appropriate colour. So, when I mixed some more coloured mortar the other day (see the previous entry), I was keen to get this area tidied up. However, it took all of 30 seconds up the ladder to realise that things were worse than I thought: where I had done the deep pointing above the rubbers, there was (already) a 2mm gap between the pointing and the rubbers. This could only be caused by the rubbers dropping down.
 Movement like this is NOT good news, so I called Pete who did the brickwork on the extension in late 2011. He came round for a look, assured me that he could sort this in less than a day, and duly turned up this week. He came armed with his Acrow prop and the "Strong Boy", a flat plate which attaches to the top of the Acrow (see second photo)- and yes, it is strong. He fitted it in under the large stone just below the soil pipe, and also fitted some shaped wood to support the brick arch. He then proceeded to remove nearly all the mortar below the Strong Boy, and ended up with some stones and all the rubbers loose (aaargh!!).
The next step was to push the arched wood up to restore the shape of the arch and then insert bits of slate between the rubbers (I think in four gaps only) to make the arch secure. Slate is brilliant for this as, after all, it was produced under thousands of tons of pressure, so in compression it is fantastically strong. Then it was replace the brickwork and mortar, tidy up the pointing and the job was done (see third photo).

I am very pleased with the result, as it has removed one of my major headaches. Since I was paying him for the day, he filled in time by doing the drilling job for the kitchen vent (see previous entry), so I got TWO tricky jobs out of the way for the price of one. Well worth £150, I reckon.

 Movement like this is NOT good news, so I called Pete who did the brickwork on the extension in late 2011. He came round for a look, assured me that he could sort this in less than a day, and duly turned up this week. He came armed with his Acrow prop and the "Strong Boy", a flat plate which attaches to the top of the Acrow (see second photo)- and yes, it is strong. He fitted it in under the large stone just below the soil pipe, and also fitted some shaped wood to support the brick arch. He then proceeded to remove nearly all the mortar below the Strong Boy, and ended up with some stones and all the rubbers loose (aaargh!!).
The next step was to push the arched wood up to restore the shape of the arch and then insert bits of slate between the rubbers (I think in four gaps only) to make the arch secure. Slate is brilliant for this as, after all, it was produced under thousands of tons of pressure, so in compression it is fantastically strong. Then it was replace the brickwork and mortar, tidy up the pointing and the job was done (see third photo).

I am very pleased with the result, as it has removed one of my major headaches. Since I was paying him for the day, he filled in time by doing the drilling job for the kitchen vent (see previous entry), so I got TWO tricky jobs out of the way for the price of one. Well worth £150, I reckon.
Loose Ends
It's been a mixed bag recently, with three jobs making significant progress after years of procrastination.
 In a spirit of tidying up I decided to mix some more of my local sand & lime putty mix for pointing; then I thought I would do some pointing myself, and my daughter visited and did some more! So the stone wall which I built last year is almost fully pointed at last (right).
Thus encouraged, I then went back to pointing the side wall of the house which I did a couple of years ago (plus a bit last year) under the new window which I fitted. Beside that window is the downpipe which had a large hole about 9 feet up; the water gushing through this caused severe damage to the wall as it had been happening over a long period of time. I only realised how bad it was when clearing the gaps out before filling - in one place I could get my flat hand into the hole, and then curl my fingers up in the void. There were also some bits where some idiot had smeared a thin coat of cement over the wall, which can only hold moisture in, rather than stop it getting in! I've now re-pointed a good deal of the worst bits on this wall, mindful of the general rule to not re-point unless absolutely necessary; this is good advice, not just for the integrity of the house but also because it really is a tedious job. I'm quite pleased with the result!
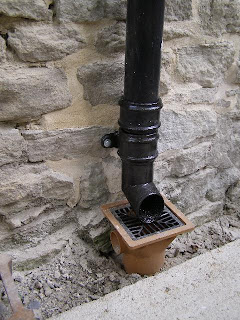 Having done that pointing, I could now attach the shoe on the bottom of the downpipe. When we took the ground level down in 2011, I had been left with an annoying gap of about 4 inches at the bottom. I really didn't want to spend £65 on a new 6 ft length, just for that, and I found a shoe which was longer than usual, but it was still a bit high above the drain. To bring it down I have used a spare elbow with a collar, and cut the bent bit off, so now there are two collars at the bottom (photo left), and it is a perfect fit (although the groundworkers always seem to attach the gully too close to the wall...).
Then I was urged by 'Er Indoors to do the last bit of skirting board in the lounge; it's one of those bits with a right angle that fits beside the chimney breast, and the old one was rotten; when I had a go a while back, it all went wrong because I didn't cut good 45 degree mitres and so the result was awful. That was pretty discouraging, spending a couple of hours and achieving absolutely nothing, so I left it.
Anyway, today I had another go and not only cut the two pieces successfully but also fitted the result in place AND painted it (photo right). Once again, I'm pleased that I can choose a job for the day and do it completely without having to go and buy anything at all.
 The third job was the drilling of the hole for the vent in the kitchen (left). This was not done when the kitchen was fitted (errr... two years ago!) as they intended to chain drill a rectangular hole through 18 inches of stone! I was not impressed as I am sure that this would have caused immense damage to the remaining wall. Today Pete (who did the brickwork on the extension in late 2011) came and drilled it with his 110mm cutter on an SDS drill, which took him about an hour and a half. It's one of those jobs that perhaps I could do myself but really I am quite happy to pay someone who knows what he's doing.
Now that the hole is done I can purchase the necessary bits to duct the extractor over the hob outside instead of re-circulating it - perhaps I will have done that by Christmas?
 In a spirit of tidying up I decided to mix some more of my local sand & lime putty mix for pointing; then I thought I would do some pointing myself, and my daughter visited and did some more! So the stone wall which I built last year is almost fully pointed at last (right).
Thus encouraged, I then went back to pointing the side wall of the house which I did a couple of years ago (plus a bit last year) under the new window which I fitted. Beside that window is the downpipe which had a large hole about 9 feet up; the water gushing through this caused severe damage to the wall as it had been happening over a long period of time. I only realised how bad it was when clearing the gaps out before filling - in one place I could get my flat hand into the hole, and then curl my fingers up in the void. There were also some bits where some idiot had smeared a thin coat of cement over the wall, which can only hold moisture in, rather than stop it getting in! I've now re-pointed a good deal of the worst bits on this wall, mindful of the general rule to not re-point unless absolutely necessary; this is good advice, not just for the integrity of the house but also because it really is a tedious job. I'm quite pleased with the result!

Then I was urged by 'Er Indoors to do the last bit of skirting board in the lounge; it's one of those bits with a right angle that fits beside the chimney breast, and the old one was rotten;
 when I had a go a while back, it all went wrong because I didn't cut good 45 degree mitres and so the result was awful. That was pretty discouraging, spending a couple of hours and achieving absolutely nothing, so I left it.
Anyway, today I had another go and not only cut the two pieces successfully but also fitted the result in place AND painted it (photo right). Once again, I'm pleased that I can choose a job for the day and do it completely without having to go and buy anything at all.

Now that the hole is done I can purchase the necessary bits to duct the extractor over the hob outside instead of re-circulating it - perhaps I will have done that by Christmas?
Monday, 15 July 2013
Paving Part 3
The paving has been continued around the back of the house, and I have taken delivery of the remaining slabs. This afternoon I have had to stop laying them as there is the last obstacle to overcome - the back door step. For this I have a 90cm x 60cm slab (and it's 40mm thick!) which I intend to lay on a bed of old engineering bricks. At least, I think that's what they are. They are larger than Imperial bricks in all dimensions, and have the texture of engineering bricks, so I reckon they must be an early version; I found them when digging the foundations for the extension. So, this afternoon, I have made some shuttering - almost of the right size. This is actually surprisingly difficult, so when your groundworker makes it look easy when doing the oversite for your extension, it is because he is skilled!
Having made the shuttering, I mixed and laid some concrete for the foundation. [Top Tip - always make sure you have enough cement and ballast for this before you start! I found that I was about a trowel-full short, which was close enough but too close for comfort.] Then, looking at the finished article, I realised that I had measured wrongly and had allowed for a slab width for the step of 70cm not 60cm. So I have shaved some off the concrete which is setting perhaps too rapidly in this heat; excuse me while I go and cover it up to protect from the sun... [2 minutes] ... I've now done that but if 'Er Indoors goes outdoors she might get a shock as I've used an old one tonne ballast bag to cover it.
Tomorrow, the step itself, and then I can finish the paving, although I'll need to hire the 9" grinder again - noisy and dusty!
Having made the shuttering, I mixed and laid some concrete for the foundation. [Top Tip - always make sure you have enough cement and ballast for this before you start! I found that I was about a trowel-full short, which was close enough but too close for comfort.] Then, looking at the finished article, I realised that I had measured wrongly and had allowed for a slab width for the step of 70cm not 60cm. So I have shaved some off the concrete which is setting perhaps too rapidly in this heat; excuse me while I go and cover it up to protect from the sun... [2 minutes] ... I've now done that but if 'Er Indoors goes outdoors she might get a shock as I've used an old one tonne ballast bag to cover it.
Tomorrow, the step itself, and then I can finish the paving, although I'll need to hire the 9" grinder again - noisy and dusty!
Subscribe to:
Posts (Atom)